QuickStart
Here’s a simple example of Smartmin with a very simple model to show you how it works. You can find out more details on each of these features in the appropriate sections but this is a good overview given a simple model.
For this example, we are going to use the ubiquitous blog example. We’ll simply add a way for authenticated users to create a blog post, list them, edit them and remove them.
To start out with, let’s create our app:
python manage.py startappp blog
Don’t forget to add the app to your INSTALLED_APPS in settings.py.
Now, let’s add a (deliberately simple) Post object to our newly created models.py:
from django.db import models

class Post(models.Model):
    title = models.CharField(max_length=128,
                             help_text="The title of this blog post, keep it relevant")
    body = models.TextField(help_text="The body of the post, go crazy")
    tags = models.CharField(max_length=128,
                            help_text="Any tags for this post")
Ok, so far, this all normal Django stuff. Now let’s create some views to manage these Post objects. This is where Smartmin comes in.
Smartmin provides a controller that lets you easily hook up Create, Read, Update, Delete and List views for your object. In Smartmin, we call this CRUDL, and we call the helper class that defines it a SmartCRUDL. So in our views.py let’s create a CRUDL for our Post object:
from smartmin.views import *
from .models import *

class PostCRUDL(SmartCRUDL):
    model = Post
You’ll see that right now, all we are doing is defining the model that our CRUDL is working with. Everything else is using defaults.
Finally, we’ll have to create a urls.py for our app, and hook in this CRUDL:
from .views import *

urlpatterns = PostCRUDL().as_urlpatterns()
Again, Smartmin keeps this very, very, DRY. The urls (and reverse patterns) are created automatically using standard Django conventions and the name of our model. The last part is you’ll need to add this urls.py to your global urls.py:
urlpatterns = patterns('',
  # .. other url patterns
  url(r'^blog/', include('blog.urls')),
)
With a quick python manage.py syncdb that should be it. You should be able to start your server and hit the index for your CRUDL object at http://localhost:8000/blog/post/ and get a view that looks like this:
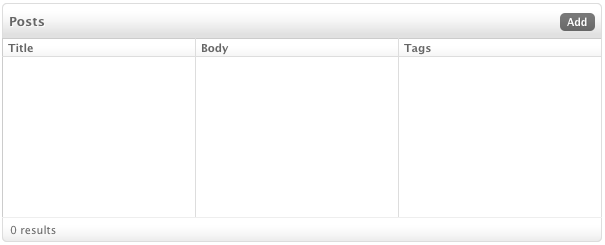
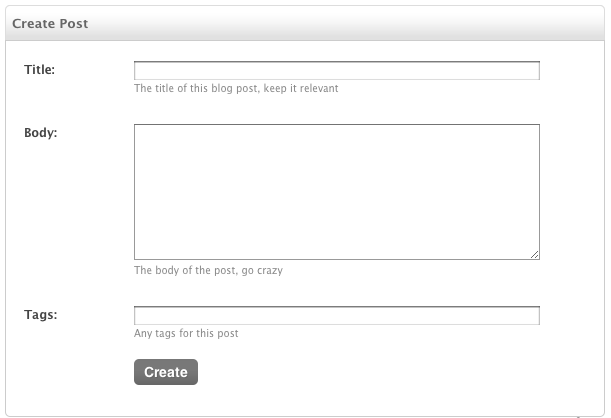
You’ll notice that CRUDL has no only wired up the views, but given us a standard list view by default. If we click on the ‘add’ button, we’ll get the default Create view for our object:
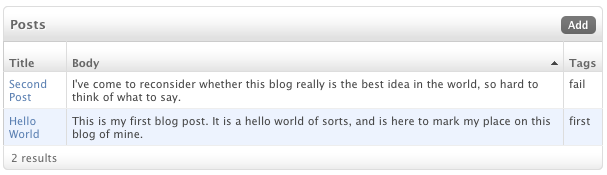
If we add a few items, we’ll see our list displays things appropriately:
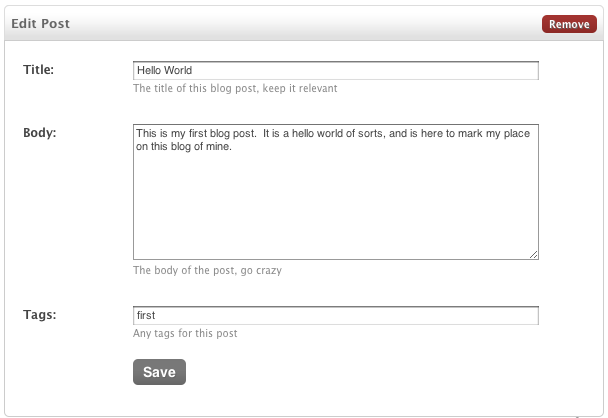
We can click on any of the items to edit them, and when editing, and from there even remove them if needed:
And that’s it. You probably want to learn how to customize things, either at the CRUDL layer or on each individual view.
Adding Search
Ok, so now we have some basic views, but let’s spruce up our list view by adding search. All we need to do to enable search is define which fields we want to be searchable. To do this we’ll have to overload the default ListView on our PostCRUDL object:
class PostCRUDL(SmartCRUDL):
  model = Post

  class List(SmartListView):
    search_fields = ('title__icontains', 'body__icontains')
    default_order = 'title'
So we are doing two things here. First, by defining search_fields we are telling smartmin to enable searching on this list view, and to search the contents of the title and body when doing searches. While we are at it, we have also set the default ordering for results to be by the title attribute.
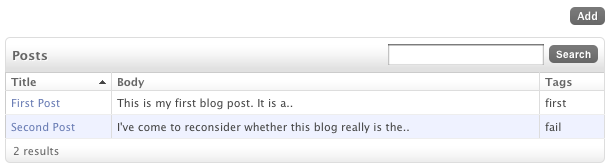
Here’s the result:

One thing that could still be better would be to only show the first few words of a post so we don’t blow up the table. We can override what smartmin uses as the value of a column by just defining a get_[fieldname] method on our view:
class List(SmartListView):
  search_fields = ('title__icontains', 'body__icontains')
  default_order = 'title'

  def get_body(self, obj):
      """ Show only the first 10 words for long post bodies. """
      if len(obj.body) < 100:
          return obj.body
      else:
          return " ".join(obj.body.split(" ")[0:10]) + ".."
That gives us this:
Permissions
Very few sites really want to allow just anybody to edit content, and the sanest way of managing who can do what is by using permissions. Smartmin uses permissions and groups throughout to help you manage this functionality easily.
So far we’ve enabled anybody to create Posts, so as a first step let’s required that only authenticated users (and admins) who have the proper privileges can access our views.
Thankfully, that’s a one line change, we just need to add the permissions=True attribute to our CRUDL object:
class PostCRUDL(SmartCRUDL):
    model = Post
    permissions = True

    # .. view definitions ..
Now when we try to view any of the CRUDL pages for our Post object we are redirected to a login page.